AWS Project: Creating Scalable AWS Infrastructure with Auto Scaling group & ALB using Terraform


🔸Introduction
Welcome to the AWS project where you will build a highly scalable and well-formed architecture of web servers using Terraform IaC. In part 1 (previous article) we created VPC architecture for our project. Now we will focus on creating a Terraform configuration that demonstrates a modular approach to managing AWS infrastructure as code. In this part, we will write an IaC for creating the following resources:
NAT gateways for both private subnets
A bastion host in the public subnet of AZ1
An Auto Scaling Group (ASG) of instances in the private subnets
Application Load Balancer
Security Groups for EC2 instances and Load Balancer
Key pair for SSH
Let me quickly get you familiar with these terms 😎
NAT Gateway:
Allows instances in private subnets to access the Internet
Has an Elastic IP to provide a stable external IP
Instances route Internet-bound traffic to the NAT Gateway
The instance itself remains hidden from the Internet
Bastion Host:
An EC2 instance placed in a public subnet
Used as a "jump box" to access instances in private subnets
Has a public IP to allow SSH access from the Internet
You SSH to the bastion host, then to the private instances
Auto Scaling Group:
Manages a group of EC2 instances and scales them automatically
Has a minimum and maximum number of instances
Can scale based on metrics, schedules or CloudWatch alarms
Launches new instances using a Launch Configuration
Application Load Balancer:
Distributes traffic to multiple EC2 instances
Handles traffic at the application layer (Layer 7)
Uses health checks to route traffic only to healthy instances
Supports HTTP/HTTPS and some TCP protocols
Can be internal or internet-facing
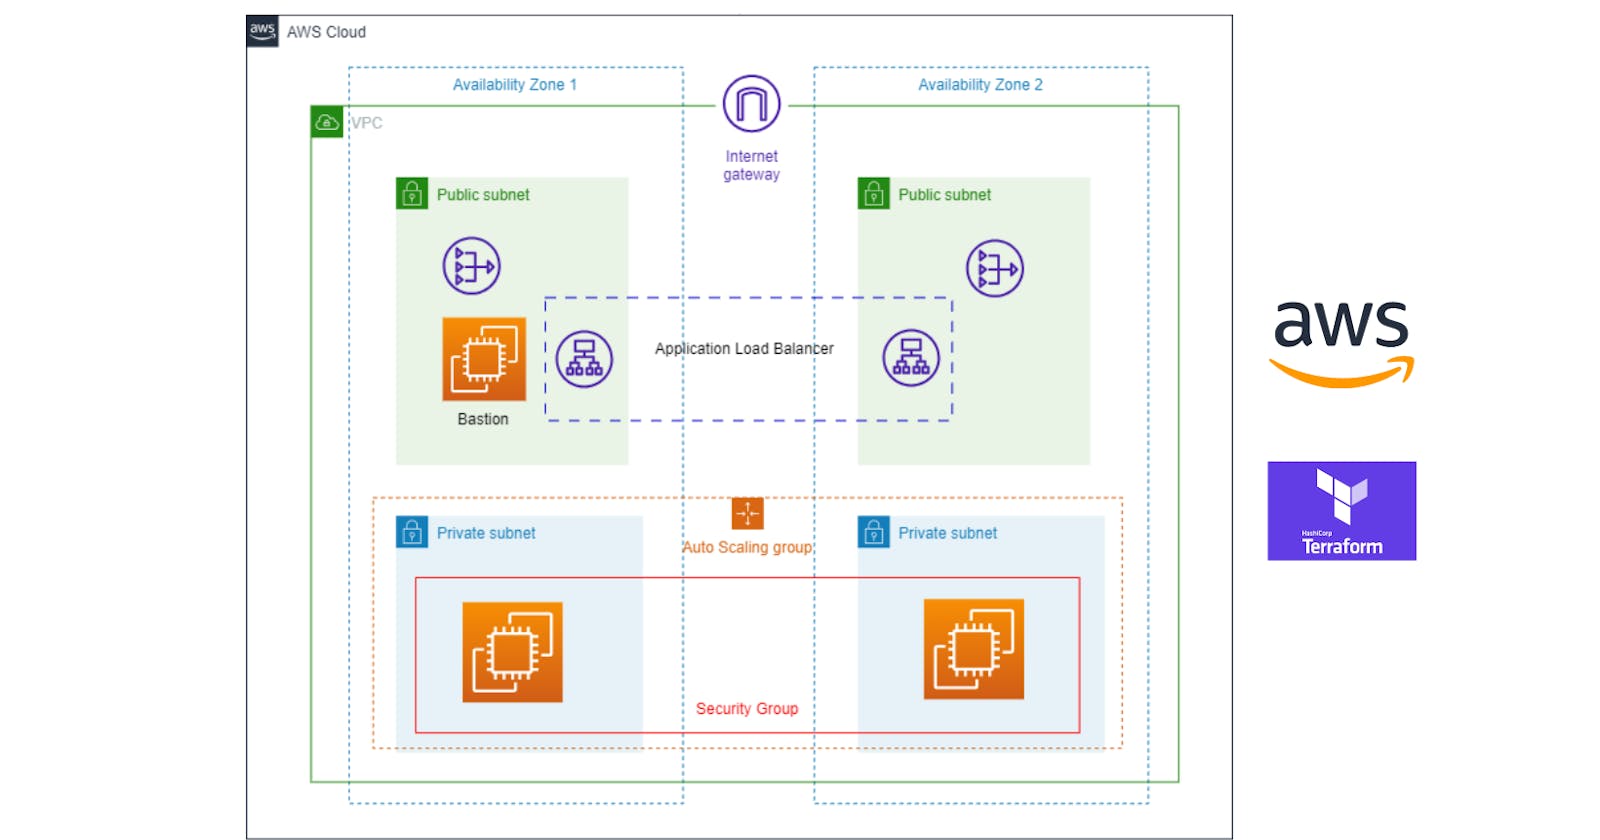
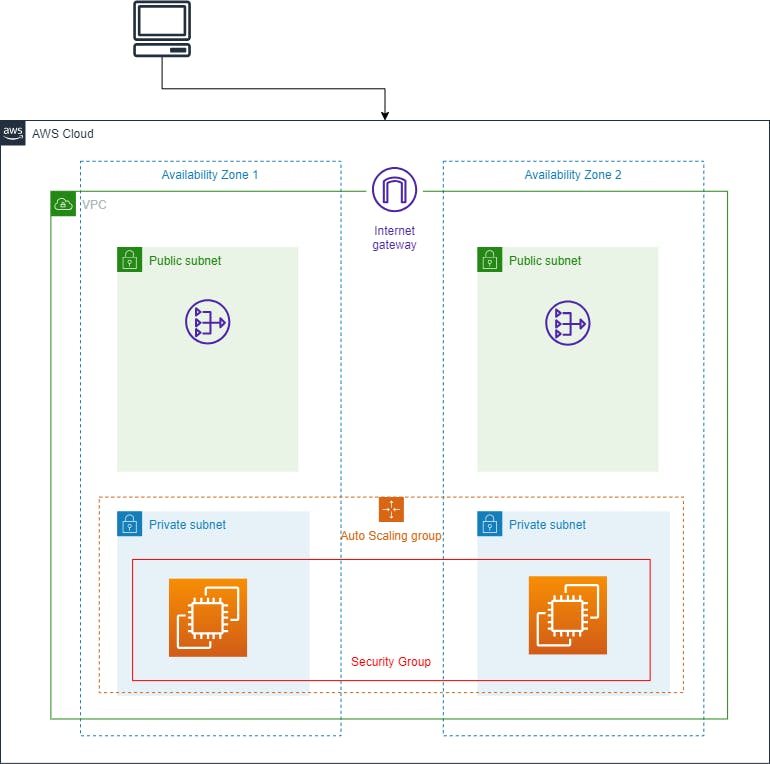
Here is the main architecture diagram of our project. The following are the things we are going to need for our project:
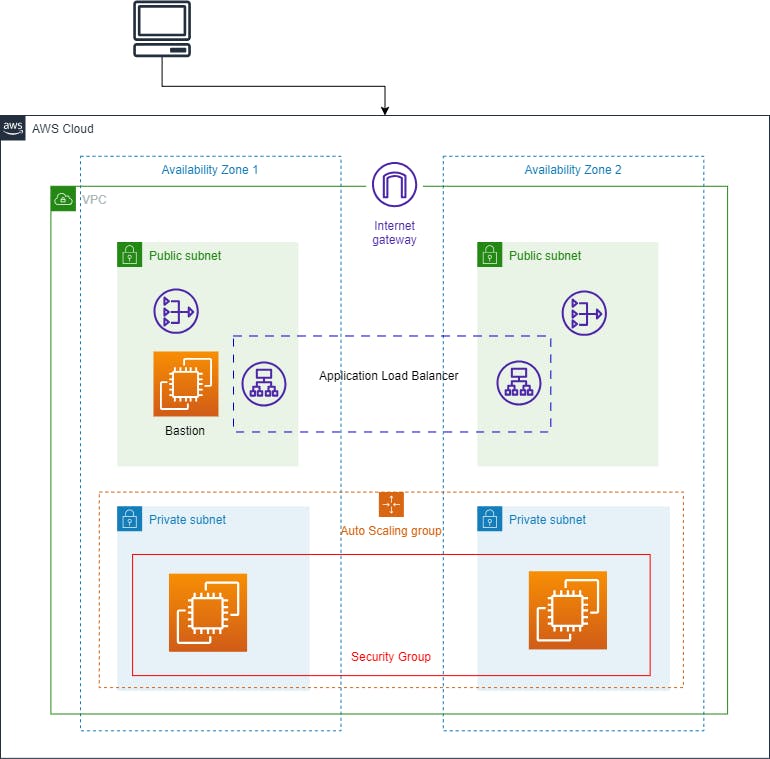
We can observe that there are two availability zones that contain a pair of private and public subnets each. Inside the Private subnets, we are going to create the AutoScaling Group having EC2 instances which will be the host servers for our website and to handle the load we have an Application Load Balancer in the Public subnet having the target groups as private instances.
Along with that, we have a NAT gateway in each public subnet which is going to provide internet traffic to the private instances for downloading the resources. This will happen via a Bastion host which is also an EC2 instance present in the Public Subnet of AZ1. It is quite difficult architecture for beginners but don't worry we will understand it deeply in the following article.
Before we begin let's go through some information about modules in Terraform 👨🔧
🔸Modules in Terraform
Modules in Terraform allow you to reuse code, abstract complexity, and organize your configurations.
Some benefits of using Terraform modules:
Reusability: Modules can be reused across multiple configurations. This avoids duplication.
Abstraction: Modules hide complexity and expose a simple interface. This makes configurations easier to understand and maintain.
Organization: Modules help organize your code into logical units.
A Terraform module has the following:
main.tf- The main Terraform configuration file. Contains resources, variables, outputs, etc.variables.tf- Defines input variables that are passed to the module.outputs.tf- Exports values that can be used by other configurations.Other files like
README.md,terraform.tfvars, etc.
For our project we will have the following structure of modules:
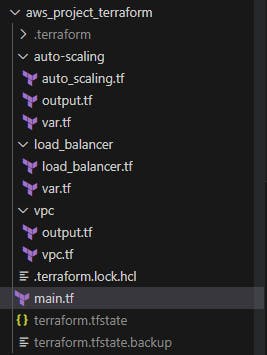
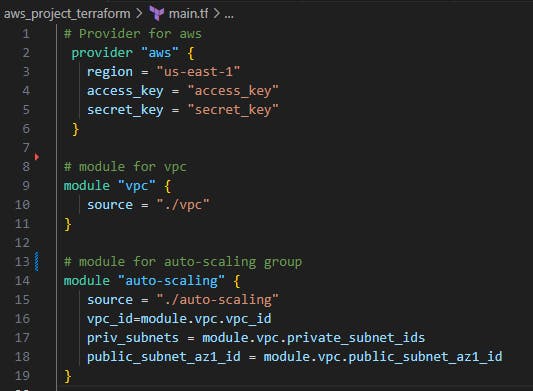
The main.tf file will look like this, which will contain all the modules and variables associated with them
Now let's begin with the changes in the VPC file ...
👨🔧The previous article had the code for vpc architecture but now we will be adding NAT gateways in that VPC.
👉Link for previous article: https://aniket-on-cloud9.hashnode.dev/aws-project-deploy-vpc-subnets-igw-and-route-tables-using-terraform
🔸NAT Gateways in VPC
Network Address Translation (NAT) Gateways allow instances in a private subnet to connect to the Internet, while preventing the Internet from initiating connections with the private instances.
The following code is setting up NAT Gateways in both Availability Zones to allow private subnets to access the Internet.
Just add this code after the VPC code which was created in the previous article.
✅Full code link: https://github.com/AniketKharpatil/DevOps-Journey/tree/main/aws_project_terraform
  # Create EIP for NAT Gateway AZ1
  resource "aws_eip" "nat-eip" {
    domain   = "vpc"
  }

  # Create NAT Gateway for AZ1
  resource "aws_nat_gateway" "nat-gw-az1" {
    allocation_id = aws_eip.nat-eip.id
    subnet_id     = aws_subnet.public-subnet-az1.id
    depends_on    = [aws_internet_gateway.main-igw]
    tags = {
      Name = "nat-gw-az1"
    }
  }

  # Create route in private route table AZ1 to NAT Gateway
  resource "aws_route" "nat-route-az1" {
    route_table_id         = aws_route_table.private-rtb-az1.id
    destination_cidr_block = "0.0.0.0/0"
    nat_gateway_id         = aws_nat_gateway.nat-gw-az1.id
  }

  # Repeat for AZ2
  resource "aws_nat_gateway" "nat-gw-az2" {
    allocation_id = aws_eip.nat-eip.id
    subnet_id     = aws_subnet.public-subnet-az2.id
    depends_on    = [aws_internet_gateway.main-igw]
    tags = {
      Name = "nat-gw-az2"
    }
  }

  resource "aws_route" "nat-route-az2" {
    route_table_id         = aws_route_table.private-rtb-az2.id
    destination_cidr_block = "0.0.0.0/0"
    nat_gateway_id         = aws_nat_gateway.nat-gw-az2.id
  }
The code does the following:
It creates an Elastic IP for each AZ -
aws_eip.nat-eip-az1andaws_eip.nat-eip-az2It attaches those EIPs to NAT Gateways in the public subnets -
aws_nat_gateway.nat-gw-az1andaws_nat_gateway.nat-gw-az2It creates routes in the private route tables for each AZ -
aws_route.nat-route-az1andaws_route.nat-route-az2
These routes point to the 0.0.0.0/0 default route at the NAT Gateway in that AZ, allowing instances in the private subnet to use the NAT Gateway for Internet access.
So in summary:
The NAT Gateways allow private subnets to access the Internet
They are attached to Elastic IPs to ensure stable IP addresses
Routes in the private route tables point traffic to the NAT Gateway in that AZ
This is done for both AZ1 and AZ2 to provide high availability
With the help of these NAT gateways, the instances which we will be creating in the private subnets can then access the Internet, while remaining hidden from the Internet itself.
🔸Auto Scaling Group
Now we are going to create an AutoScalingGroup in the private subnets present in both Availability Zones.
The ASG instances have the following configuration:
A security group is created allowing SSH from anywhere(0.0.0.0/0)
A launch configuration is created using the AMI and security group
An autoscaling group is created using that launch configuration and attached to the private subnets
It has a min/max size of 1-4 instances
with 2 default 1 minimum and 4 maximum
This will create and manage EC2 instances in the private subnets.
# Get the latest Linux AMI
  data "aws_ami" "amazon_linux" {
    most_recent = true

    filter {
      name   = "virtualization-type"
      values = ["hvm"]
    }

    filter {
      name   = "name"
      values = ["amzn-ami-hvm*"]
    }

    owners = ["amazon"]
  }

  # Security group for ASG instances
  resource "aws_security_group" "asg_SecurityGroup" {
    name        = "asg-instances"
    description = "SG for ASG instances"
    vpc_id      = var.vpc_id
    tags = {
      Name = "ASG-SecurityGroup"
    }

    ingress {
      from_port   = 22
      to_port     = 22
      protocol    = "tcp"
      cidr_blocks = ["0.0.0.0/0"]
      description = "Allow incoming SSH connections"
    }
  }

  # Launch configuration
  resource "aws_launch_configuration" "lc" {
    name_prefix     = "terraform-lc"
    image_id        = data.aws_ami.amazon_linux.id
    instance_type   = "t2.micro"
    security_groups = [aws_security_group.asg_SecurityGroup.id]

    # can bring you cost if enabled
    enable_monitoring = false

    lifecycle {
      create_before_destroy = true
    }
  }

  # Auto scaling group
  resource "aws_autoscaling_group" "private_asg" {
    name                 = "terraform-asg"
    launch_configuration = aws_launch_configuration.lc.name
    vpc_zone_identifier  = var.subnets

    min_size = 2
    max_size = 4

    tag {
      key                 = "Name"
      value               = "project-asg-instance"
      propagate_at_launch = true
    }
  }
🔸Bastion Host
The bastion host is created with the following configuration:
It gets the latest Amazon Ubuntu AMI
Creates a key pair for SSH access
Creates a security group allowing HTTP/SSH inbound from 0.0.0.0/0
Creates an EC2 instance(named Bastion) in the public subnet using that AMI, key pair and security group
Associates a public IP so it can be accessed from the Internet
Why Bastion Host?
This allows you to SSH into the bastion host and then jump to the private instances.
Create Bastion host
  # keypair for public ec2 instance
  resource "aws_key_pair" "bastion_key" {
    key_name   = "tf_key"
    public_key = file("~/.ssh/id_rsa.pub")
  }

  # Security group for bastion host
  resource "aws_security_group" "bastion-sg" {
    name        = "bastion-sg"
    description = "SG for bastion host"
    vpc_id      = var.vpc_id
    tags = {
      Name = "bastion-sg"
    }

    ingress {
    from_port   = 80
    to_port     = 80
    protocol    = "tcp"
    cidr_blocks = ["0.0.0.0/0"]
    description = "Allow incoming HTTP connections"
    }

    ingress {
      from_port   = 22
      to_port     = 22
      protocol    = "tcp"
      cidr_blocks = ["0.0.0.0/0"]
      description = "Allow incoming SSH connections"
    }

    egress {
      from_port   = 0
      to_port     = 0
      protocol    = "-1"
      cidr_blocks = ["0.0.0.0/0"]
    }
  }

  # Bastion host instance
  resource "aws_instance" "bastion" {
    ami           = data.aws_ami.amazon_linux.id
    instance_type = "t2.micro"
    key_name = aws_key_pair.bastion_key.key_name
    vpc_security_group_ids = [aws_security_group.bastion-sg.id]
    subnet_id = var.public_subnet_az1_id

    associate_public_ip_address = true
    monitoring = false
    tags = {
      Name = "Bastion Host"
    }
  }
This code does the following
Generates an SSH key pair
Creates a security group to allow SSH and HTTP access
Launches an Amazon Linux t2.micro instance in a public subnet
Assigns the security group and key pair to the instance
Associates a public IP address
Tags the instance as "Bastion Host" Once the bastion host is created we can SSH into it and install the server inside our private instances.
Refer this to SSH into AWS instance:https://docs.aws.amazon.com/AWSEC2/latest/UserGuide/connect-linux-inst-from-windows.html

😎You can install any server of your choice I have the following scripts ready which will help to install and run Apache server.
  #!/bin/bash

  # Update all packages
  sudo yum update -y

  # Install Apache2
  sudo yum install -y apache2

  # Enable Apache2 service
  sudo systemctl enable apache2
  sudo systemctl start apache2

  # Create HTML file
  echo "<html>
    <body>
      <h1>Welcome to my website</h1>
    </body>
  </html>" > /var/www/html/index.html

  # Restart Apache2 to load new HTML file
  sudo systemctl restart apache2
The next step is to create a Load Balancer 🔃
🔸Application Load Balancer
# ALB Security Group
  resource "aws_security_group" "alb_sg" {
    name        = "alb-sg"
    description = "Security group for ALB"
    vpc_id      = var.vpc_id
    tags = {
      Name = "ALB-SG"
    }

    ingress {
      from_port   = 80
      to_port     = 80
      protocol    = "tcp"
      cidr_blocks = ["0.0.0.0/0"]
    }

    egress {
      from_port   = 0
      to_port     = 0
      protocol    = "-1"
      cidr_blocks = ["0.0.0.0/0"]
    }
  }

  # ALB
  resource "aws_lb" "app_lb" {
    name               = "app-lb"
    internal           = false
    load_balancer_type = "application"
    subnets            = [var.public_subnet_az1_id, var.public_subnet_az2_id]
  }

  # Create target group for instances in private subnets
  resource "aws_lb_target_group" "private_tg" {
    name     = "private-tg"
    port     = 80
    protocol = "HTTP"
    vpc_id   = var.vpc_id
  }

  # Register ASG instances with target group
  resource "aws_autoscaling_attachment" "asg_attach_lb" {
    autoscaling_group_name = var.private_asg_id
    lb_target_group_arn   = aws_lb_target_group.private_tg.arn
  }

  # Create internal load balancer listener
  resource "aws_lb_listener" "internal_alb_listener" {
    load_balancer_arn = aws_lb.app_lb.arn
    port              = "80"
    protocol          = "HTTP"

    default_action {
      type             = "forward"
      target_group_arn = aws_lb_target_group.private_tg.arn
    }
  }
Here is what exactly this terraform file configuration creates:
First, we create an AWS security group named "alb-sg" for our load balancer. This security group allows inbound HTTP traffic on port 80 from 0.0.0.0/0
It then creates an AWS Application Load Balancer named "app-lb". It attaches this ALB to the public subnets with IDs var.public_subnet_az1_id and var.public_subnet_az2_id.
Next, an ALB target group named
private-tgon port 80 is made which will handle HTTP traffic to our instances. This target group is associated with the VPC ID stored in var.vpc_id.It then attaches the Auto Scaling Group with ID
var.private_asg_idto the target group using an AWS autoscaling attachment. This will register both the private EC2 instances launched by the ASG with the target group.Finally, it creates an HTTP listener on port 80 of the ALB. The default action of this listener is configured to forward traffic to the private-tg target group.

In summary, as it creates the resources, it:
Creates a security group
Creates an Application Load Balancer
Creates a target group
Attaches an Auto Scaling Group to the target group
Creates an ALB listener to forward traffic to the target group
Once all this is done we will create a main.tf file which will call all these modules and create a central launch config.
🔸Main code
It imports the VPC module, auto-scaling module and the ALB module to create those resources.
The VPC ID is stored in
module.vpc.vpc_idWe are passing the VPC ID to the auto-scaling module so it can launch instances in that VPC.
Finally, we import the ALB module to create an Application Load Balancer. It passes the VPC ID, public subnet IDs and the Auto Scaling Group ID to the module.
The ALB module will then use this information to:
Create the security group, target group and an ALB listener forwarding traffic to the target group.
You can now run the terraform commands in the folder where main.tf is located :
terraform init

terraform plan

terraform apply -auto-approve
So in summary, this main.tf file:
Defines the AWS provider
Imports 3 modules - VPC, Auto Scaling and ALB
Passes necessary information as variables to the modules so they can integrate
As we saw the modules are actually the files we created which themselves contain the actual Terraform configuration to deploy the VPC, Auto Scaling Group and Application Load Balancer respectively.
👉You can find the Terraform files on Github, link: https://github.com/AniketKharpatil/DevOps-Journey/tree/main/aws_project_terraform
The benefit of this modular approach is reusability, abstraction and easier management of complex infrastructure.
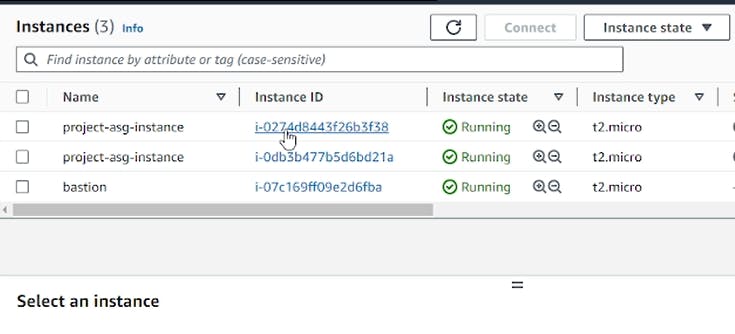
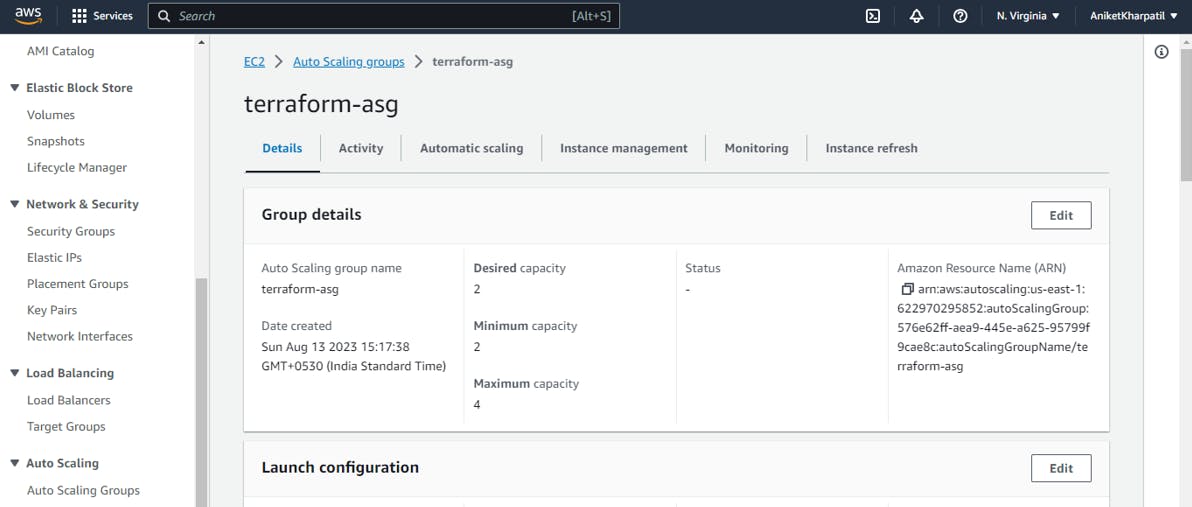
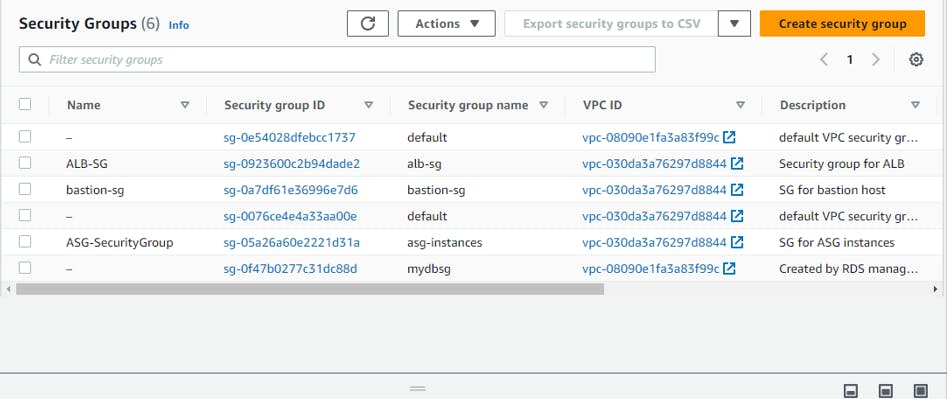
Final screenshots of the resources created by our terraform code:
Bastion:

Auto Scaling Group:
Security Groups:
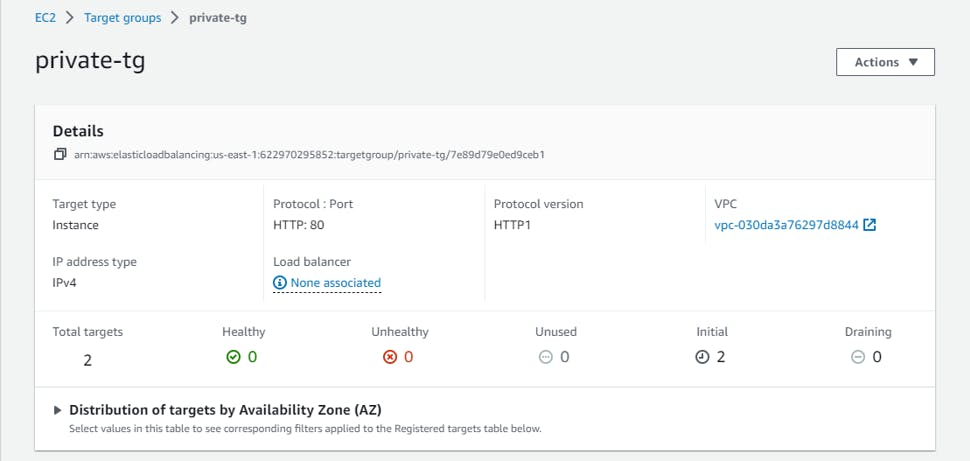
Target Group:
Application Load Balancer:

🔸Conclusion
You can see that the target group is showing 0 healthy and 0 unhealthy servers because I have not installed anything on the Linux instances. Once the apache server( or any web server) is installed it will be changed to a healthy state. Now whenever any instance gets overloaded it will be balanced by our Load balancer and in case there is a failure the Auto Scaling group will create a new instance as soon as the previous one goes down.
So in summary, using Infrastructure as Code with Terraform gave us many benefits beyond just provisioning the infrastructure in a repeatable way. We created an Auto Scaling Group of EC2 instances in the private subnets. The ASG ensures that the desired number of instances are always running to scale the application. We provisioned an Application Load Balancer to distribute traffic to the EC2 instances in the ASG. The ALB provides a single point of access for the application.
The configuration approach enables collaboration, security, auditability, scaling and ease of maintenance. Hope you enjoyed this article and learned new things about AWS architecture + Terraform with practical implementation, Thank you for reading! 😁