AWS Project: Deploy VPC, Subnets, IGW and Route Tables using Terraform

Dynamic DevOps Engineer with expertise in Kubernetes, AWS Cloud, CICD pipelines, and GitOps, specializing in automation, monitoring, and scalable solutions. Skilled in optimizing workflows, managing production releases, and driving efficiency in cloud-native environments. As a lifelong learner and problem-solver, I thrive on tackling complex business challenges by leveraging the latest DevOps tools, best practices, and innovation.
🔸Introduction:
In AWS, one of the fundamental networking components is the Virtual Private Cloud or VPC. A VPC allows us to define a virtual network within AWS, containing subnets and other networking resources.
Provisioning VPCs manually through the AWS console can be time-consuming and prone to errors. Using Terraform as IaaC tool, we can define our VPC configuration in files and let Terraform automatically provision all required resources.
Important Note: This blog is part of major AWS project which is going to be continued in the next blog where I'll also create an AWS EC2 instance and other resources in the VPC environment the same way using Terraform. So this is the first part of the main project.
In this article, we will see how to:
Create a VPC using Terraform
Provision public and private subnets
Attach an Internet Gateway
Associate route tables
Before we begin with the project, let's have a look at what exactly is terraform. If you want to know in depth you can read my blog on Terraform here 👉 https://aniket-on-cloud9.hashnode.dev/understanding-iac-and-terraform
...else just keep reading below 😁
🔸Terraform basics:
Terraform is a free and open-source infrastructure as code (IAC) that can help to automate the deployment, configuration, and management of remote servers.
Download it here: https://developer.hashicorp.com/terraform/downloads
Terraform can manage both existing service providers and custom in-house solutions 👨🔧 The code is written in a .tf file which includes the following components
Important Components of .tf file:
Provider: The aws provider block tells Terraform that we are managing AWS resources. It looks like this:
provider "aws" {
  region = "us-east-1"
  access_key = "my-access-key"
  secret_key = "my-secret-key"
}
We specify the AWS region we want to deploy to.
Resources: We define resources using resource blocks. For example:
resource "aws_vpc" "main-vpc" {
  cidr_block = "10.0.0.0/16"
}
This defines an AWS VPC resource named main.
Dependencies: Terraform automatically determines dependencies between resources and creates them in the correct order. For example, the Internet Gateway resource depends on the VPC resource, so Terraform will create the VPC first, then the Internet Gateway.
Variables File:- Terraform variables lets us customize aspects of Terraform modules without altering the module's source code. This allows us to share modules across different Terraform configurations, reusing same data at multiple places.
Lifecycle: When you run terraform plan & terraform apply, Terraform will:
Plan - Figure out what it needs to do (create, update, delete resources)
Apply - create, update or delete resources.
😎Okay, so we have understood the basics of what Terraform is about and how the Terraform file is configured to create AWS resources. Now let's work on our project for creating a custom VPC in AWS.
🔸VPC Architecture
Here are the things we are going to create for our project:
Now we are going to create this infrastructure using a .tf file
Using this Terraform file we are going to create an AWS VPC with public and private subnets across two Availability Zones. The key resources which will be created are:
An AWS VPC named
main-vpcwith a CIDR block of10.0.0.0/16Two public subnets (one in each AZ) with CIDR blocks
10.0.1.0/24and10.0.2.0/24Two private subnets (one in each AZ) with CIDR blocks
10.0.3.0/24and10.0.4.0/24An Internet Gateway attached to the VPC to enable public subnets to access the internet
A public route table to route traffic from the public subnets to the Internet Gateway
The public subnets associated with the public route table
A private route table for each AZ
The private subnets - associated with their respective private route tables
An endpoint to allow the VPC to access S3
surprised yet? keep reading...

🔸Steps to create the VPC Infrastructure
Alright, now we know what are the main requirements and how we have to create them. Create a new file main.tf and add the below code snippets one by one to this file.
AWS Provider:
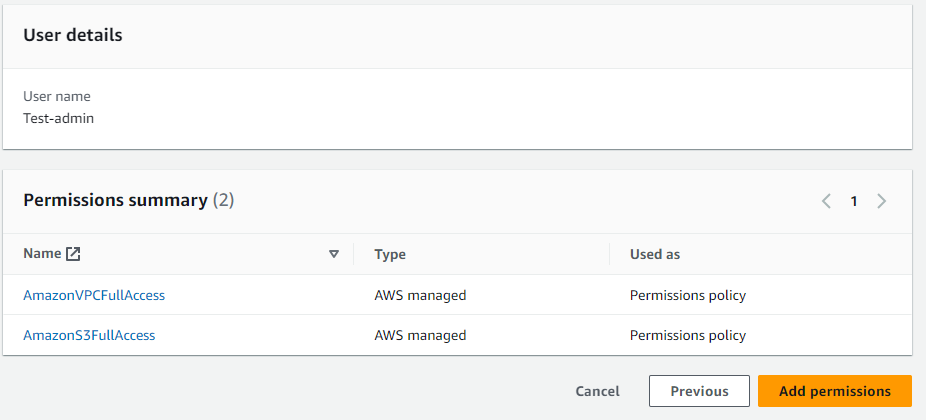
  provider "aws" {
    region = "us-east-1"
    access_key = "my-access-key"
    secret_key = "my-secret-key"
  }
You will need to create an IAM user with VPC Full access and S3 full access, and then get the access key and secret key for CLI.
🧐If you don't know from here to get aws IAM user access keys just follow this tutorial: https://docs.aws.amazon.com/IAM/latest/UserGuide/id_credentials_access-keys.html
Create VPC:
   # Create VPC
   resource "aws_vpc" "main-vpc" {
       cidr_block = "10.0.0.0/16"
       tags = {
         Name = "main-vpc"
       }
   }
This creates an AWS VPC resource with the CIDR block 10.0.0.0/16 in the given region.
Create Public and Private Subnets:
   # Create public and private subnets

   # Create public subnet in AZ1
   resource "aws_subnet" "public-subnet-az1" {
       vpc_id            = aws_vpc.main-vpc.id
       cidr_block        = "10.0.1.0/24"
       availability_zone = "us-east-1a"
       tags = {
             Name = "public-subnet-az1"
          }
   }

   # Create public subnet in AZ2
   resource "aws_subnet" "public-subnet-az2" {
       vpc_id            = aws_vpc.main-vpc.id
       cidr_block        = "10.0.2.0/24"
       availability_zone = "us-east-1b"
       tags = {
             Name = "public-subnet-az2"
          }
   }

   # Create private subnet in AZ1
   resource "aws_subnet" "private-subnet-az1" {
       vpc_id            = aws_vpc.main-vpc.id
       cidr_block        = "10.0.3.0/24"
       availability_zone = "us-east-1a"
       tags = {
             Name = "private-subnet-az1"
          }
   }

   # Create private subnet in AZ2
   resource "aws_subnet" "private-subnet-az2" {
       vpc_id            = aws_vpc.main-vpc.id
       cidr_block        = "10.0.4.0/24"
       availability_zone = "us-east-1b"
       tags = {
             Name = "private-subnet-az2"
          }
   }
This creates 2 public subnets in 2 AZs
us-east-1aandus-east-1bwithin the VPC with respective CIDRs. Similarly, 2 private subnets are created in each AZs.Create the Internet Gateway:
   # Create Internet Gateway
   resource "aws_internet_gateway" "main-igw" {
       vpc_id = aws_vpc.main-vpc.id
       tags = {
             Name = "main-igw"
          }
   }
This creates an Internet Gateway and attaches it to the main VPC.
Creating Public Route Table:
   # Create public route table
   resource "aws_route_table" "public-rtb" {
     vpc_id = aws_vpc.main-vpc.id
     route {
       cidr_block = "0.0.0.0/0"
       gateway_id = aws_internet_gateway.main-igw.id
     }
     tags = {
             Name = "public-rtb"
          }
   }
This creates a public route table for the VPC. Route tables are used to control the routing of traffic in and out of subnets in a VPC. This route in the public route table routes
0.0.0.0/0traffic to the internet gatewayCreating the public Route Table Association for public subnets:
   # Association of public route table

   # Associate public route table with public subnets
   resource "aws_route_table_association" "public-rtba-az1" {
     subnet_id      = aws_subnet.public-subnet-az1.id
     route_table_id = aws_route_table.public-rtb.id
   }

   resource "aws_route_table_association" "public_rtba-az2" {
     subnet_id      = aws_subnet.public-subnet-az2.id
     route_table_id = aws_route_table.public-rtb.id
   }
By associating a subnet with a route table, we apply the routes defined in that route table to traffic originating from that subnet.
In this case, we have:
A public route table (aws_route_table.public-rtb)
Two public subnets (aws_subnet.public-subnet-az1 and aws_subnet.public-subnet-az2)
Since we have a route to the Internet Gateway in the public route table, this will give the public subnets internet access.
Create and associate private route tables to private subnets:
   # Create and Associate private route tables

   # Create private route table for AZ 1
   resource "aws_route_table" "private-rtb-az1" {
     vpc_id = aws_vpc.main-vpc.id
     tags = {
             Name = "private-rtb-az1"
          }
   }

   # Create private route table for AZ 2
   resource "aws_route_table" "private-rtb-az2" {
     vpc_id = aws_vpc.main-vpc.id
     tags = {
             Name = "private-rtb-az2"
          }
   }

   # Associate private route table 1 with AZ1 private subnet
   resource "aws_route_table_association" "private-rtba-az1" {
     subnet_id      = aws_subnet.private-subnet-az1.id
     route_table_id = aws_route_table.private-rtb-az1.id
   }

   # Associate private route table 2 with AZ2 private subnet
   resource "aws_route_table_association" "private-rtba-az2" {
     subnet_id      = aws_subnet.private-subnet-az2.id
     route_table_id = aws_route_table.private-rtb-az2.id
   }
In this step, we are going to create a private route table similar to the previous step. The first association associates the
private-subnet-az1subnet with theprivate-rtb-az1route table. The second association associates theprivate-subnet-az2subnet with theprivate-rtb-az2route table.By associating each private subnet with its corresponding private route table, we apply the routes in those private route tables to traffic originating from those private subnets. Since these are private subnets, they likely do not have a route to an Internet Gateway. So traffic will only be routed to other subnets and resources within the VPC.
✅Note: The use of separate route tables per AZ for the private subnets follows a good practice of having redundancy - if one AZ fails, the other is still functioning independently.Create an endpoint to AWS S3 bucket:
   # Endpoint to S3 bucket
   resource "aws_vpc_endpoint" "ep-s3" {
     vpc_id       = aws_vpc.main-vpc.id
     service_name = "com.amazonaws.us-east-1.s3"
     route_table_ids = [aws_route_table.private-rtb-az1.id, aws_route_table.private-rtb-az2.id]
     tags = {
             Name = "ep-s3"
          }
   }
That was the final step. Now, we are all set up with our code and ready to deploy this infrastructure online.
You can refer to the whole code on my repo 👉 https://github.com/AniketKharpatil/DevOps-Journey/blob/main/terraform_vpc/main.tf

Feeling tired? grab a cup of coffee ☕
Don't worry if you missed any part or got something wrong. We will be able to check it using terraform commands. and finish up the next part which is the most interesting one 😁
🔸Deploy the Infrastructure to AWS cloud:
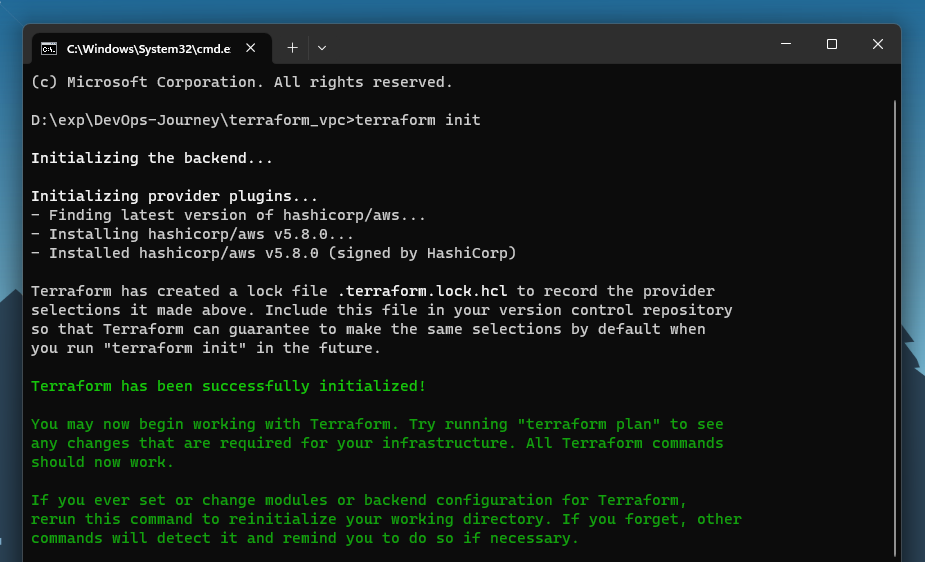
Initialize Terraform. This downloads the required provider plugins - the command is as follows:
terraform init
The output will look like this
Next is to check the Terraform plan. This will show what changes Terraform intends to make. It gives a brief of what all resources are required to be created, deleted or changes are being made in which specific resource
terraform plan

Finally, apply the Terraform configuration. This will provision the resources.
terraform apply
Terraform will show a preview of changes and ask for confirmation. Type "yes" to apply. Terraform will make API calls to provision the resources.

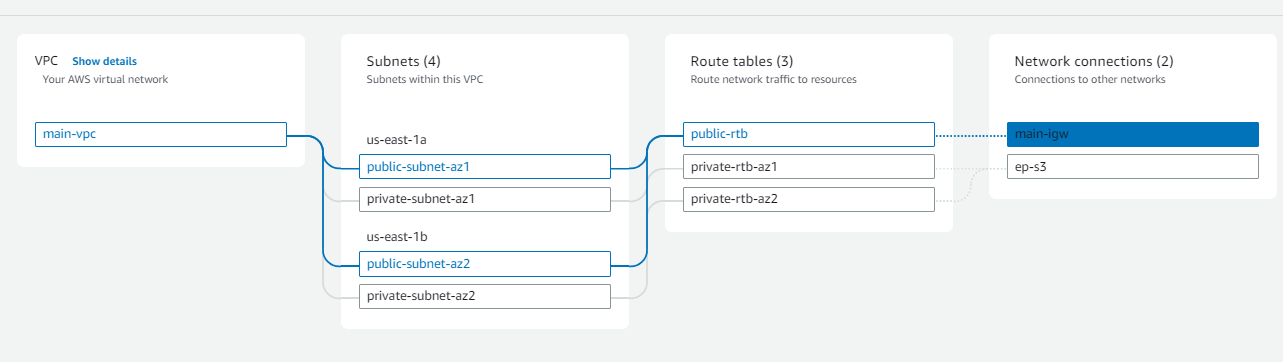
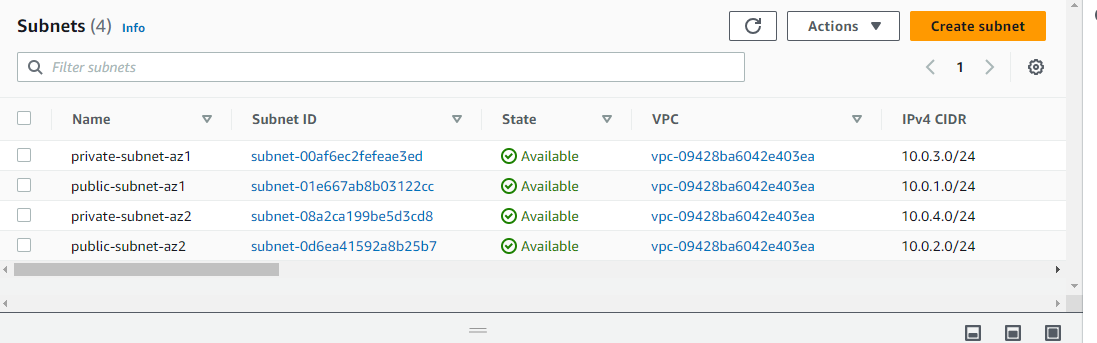
After running the scripts log in to your AWS management console using the account whose access key is utilized. From the services select VPC, and you will see a VPC named main-vpc is created.

Go to the network map which will show the flow of our network
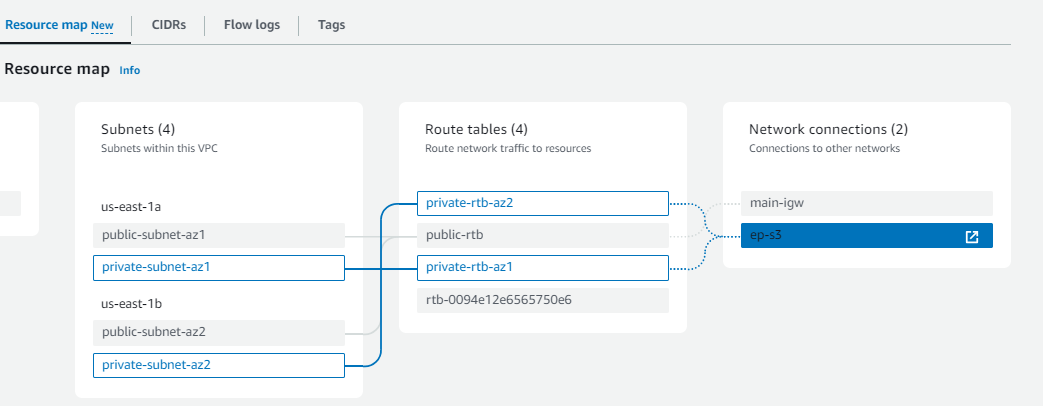
The subnets are created as follows📢 We will be using these to maintain our ec2 instances within them
Now you can destroy these resources using the command:
terraform destroy

This will terminate all the resources which were created by the terraform apply command. It will ask for a confirmation and show the preview of what is to be destroyed, type"yes" and then the AWS VPC infrastructure will be deleted from your console.
🔸Conclusion
We learned about Terraform as IaaC tool to provision and configure AWS VPC with a .tf file and got the respective resources created in our AWS console.
We successfully created our subnets and route tables associated to them in two different Availability zones.
In summary, this infrastructure was able to create:
A VPC to host the resources
Public subnets to host public-facing resources
Private subnets to host private resources
Isolated routing for public and private subnets
Access to S3 via the VPC Endpoint through private subnets
In the next part of this project, we will create an EC2 instance and create security rules for our subnets. Along with that, we will explore more about the use of variables file, output file and tfvars file in Terraform. Till then keep learning and enjoy reading my Cloud blogs ☁️
###


