Taste Terraform
Terraform practical implementation for creating AWS cloud resources in a quick and simple way!

Dynamic DevOps Engineer with expertise in Kubernetes, AWS Cloud, CICD pipelines, and GitOps, specializing in automation, monitoring, and scalable solutions. Skilled in optimizing workflows, managing production releases, and driving efficiency in cloud-native environments. As a lifelong learner and problem-solver, I thrive on tackling complex business challenges by leveraging the latest DevOps tools, best practices, and innovation.
Welcome back 👋🏻, in this article, we'll create an S3 Bucket on AWS with the help of Terraform and understand the practical implementation of .tf files + terraform commands. If you haven't read my first blog on Infrastructure-as-a-Code(IaC) using Terraform go have a look at it to get an understanding of IaC 👀.
Terraform Intro
Just for revision, Terraform is an IaC tool that lets you define both cloud and on-prem resources in human-readable configuration files that you can version reuse, and share. Let's understand the core working of terraform which consists of three main stages
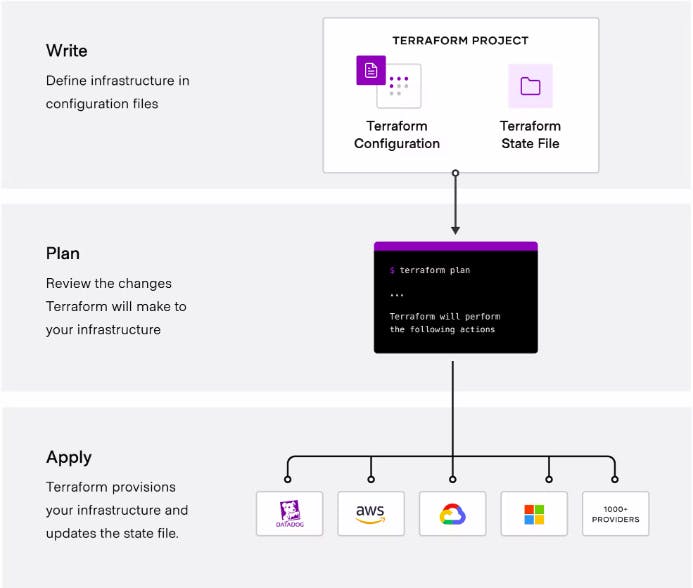
Common terraform commands which we'll be using⚡️:
terraform init- to initiate the configuration and download any plugins required.terraform plan-The plan command is important because it allows you to preview the changes for accuracy before actually making them.terraform apply- After you review the execution plan, apply your changes.You can use
--auto-approveon the command line for a briefer output.terraform destroy- It destroys all the resources which you have configured in .tf file and applied them.
For this project, we'll require some installations to be done. Let's go through them one by one.
Requirements for the project task
What you need:
An active AWS account (Free tier, dont have one? create now! Here's the link https://aws.amazon.com/resources/create-account/ ). It is best practice not to use the root user. Create an IAM user with admin privileges.
Terraform installed on your laptop/pc. If you are using VS Code, install the terraform extension. It helps with most autocompletes and makes work easy. Download from here https://developer.hashicorp.com/terraform/downloads
Install AWS CLI on your machine and configure it with the IAM user credentials. I've explained this step below in detail.
The first two steps are easy you can install terraform and check it from your Windows cmd or Linux terminal. Use the command terraform -v or terraform -version to check the version and if you get the following output it's done!

(ps: I'm on my Linux machine 👾)
For the next step, you might need to understand some basics of AWS CLI and its installation process.
What is AWS CLI? Installation and configuration
The AWS Command Line Interface (AWS CLI) is a unified tool to manage your AWS services. With just one tool to download and configure, you can control multiple AWS services from the command line and automate them through scripts.
To install AWS CLI go through the following steps. You can also follow AWS docs https://docs.aws.amazon.com/cli/latest/userguide/getting-started-install.html
Step 1: Download and run the AWS CLI MSI installer for Windows (64-bit): https://awscli.amazonaws.com/AWSCLIV2.msi
Step 2: To confirm the installation, open the Start menu, search for cmd to open a command prompt window, and at the command prompt use the aws --version command. Same for Linux machines.
You'll get similar output:

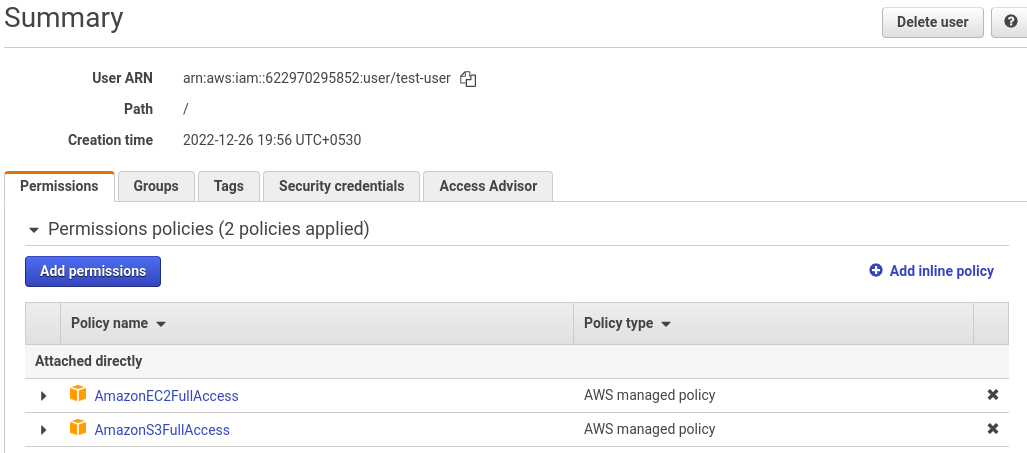
We now need to create an IAM user in order to operate AWS CLI. So, we'll quickly open the AWS console and create a new user which will have access to S3 and EC2.
Go to IAM service and select Users from the left navigation panel. Click on Add users and create a user named
test-user(you can give any name🐬)
Click next and select "Attach existing policies directly" then add the policies named AmazonEC2FullAccess and AmazonS3FullAccess


Next->Review and click "Create user" you'll get the user credentials, copy and save them somewhere safe we'll require them in the future.
🐢 Access key ID, Secret Access key and Password
Now, you'll see the new user created having the following policies
Now let's configure AWS CLI with the help of following commands. Open cmd and run the command given below:
aws configure
It'll pop up some options, fill them properly with the credentials which you got from the newly created IAM user.

This is an example output you can select any region of your choice. Here's the quick link for regions 👇https://docs.aws.amazon.com/AmazonRDS/latest/UserGuide/Concepts.RegionsAndAvailabilityZones.html
Once the configuration is done we are all set to work on our IaC, I mean the terraform code file🧑💻.

Creating AWS S3 bucket with Terraform
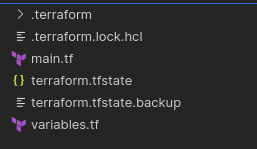
Create a folder named tf_bucket in your favorite location on your System😉 and Open VS-Code. In this example, two Terraform template files are created. They’re named main.tf and variables.tf. Both of these files will contain the S3 bucket name, configurations, access keys to user profiles so that the bucket can be accessible, and a region to store the bucket.

Step 1: Create the main.tf File
Use the following code in the main.tf file:
terraform {
    required_providers {
        aws={
            source="hashicorp/aws"
            version=">= 3.15"
        }
    }
}

#Provider details for AWS
provider "aws" {
    region     = var.aws_region
    access_key = var.aws_access_key
    secret_key = var.aws_secret_key
}

#Resources required for aws S3 bucket

resource "aws_s3_bucket" "s3_bucket" {
    bucket = var.bucket_name
}
resource "aws_s3_bucket_acl" "acl" {
  bucket = aws_s3_bucket.s3_bucket.id
  acl    = var.acl_status
}
resource "aws_s3_bucket_versioning" "versioning_example" {
  bucket = aws_s3_bucket.s3_bucket.id
  versioning_configuration {
    status = var.versioning_status
  }
}
Explanation: (That's why I've written this big blog)🎅🏻. Okay, so we have written a code with three blocks. Ah well... actually five.
The terraform {} block contains terraform settings including the resources required to provision your infrastructure. Here we are creating AWS resources hence using aws{} Provider with source and version from Terraform.
The provider{} block configures the specified provider, in this case, it's "aws" having our region and credentials as variable values.
The resource{} block defines the components of your infrastructure, it can be a physical or virtual component, in our case S3 bucket. It has two strings that define "resource type" and the "resource name". Both of them form a unique ID for the resource. Terraform uses this ID for identifying the resource when planning changes or when you refer it to other parts of the IaC configuration. We have 3 resources, all are related to the creation of S3 bucket and its properties.
Step 2: Create the variables.tf File
variable "bucket_name" {
    type = string
    description = "The name of bucket should be unique"
    default = "mys3bucket26dec2022"
}
variable "acl_status" {
    type = string
    description = "ACL policy for bucket"
    default = "private"
}
variable "versioning_status" {
    type = string
    description = "The status of versioning to be enabled or disabled"
    default = "Enabled"
}

#AWS Credentials make sure to keep them secure and do not expose anywhere directly. For this we can use the test.tfvars file

variable "aws_access_key" {
    type = string
    description = "AWS access key"
    default = "YOUR_ACCESS_KEY_ID"
}
variable "aws_secret_key" {
    type = string
    description = "AWS Secret Key"
    default = "YOUR_SECRET_ACCESS_KEY"
}
variable "aws_region" {
    type = string
    description = "Region in which the IAM user was created"
    default = "us-east-1"
}
We're simply defining our variables in this file which are going to be used in the main.tf file. Every variable starts with variable "variable_name"{} and contains the type, description & default value of the variable.
🌟 Remember to give a unique name to your bucket and edit "YOUR_ACCESS_KEY_ID" and "YOUR_SECRET_ACCESS_KEY" with your respective credentials which you saved while creating IAM User.
Step 3: Running our code using terraform commands
terraform init initializes the configuration directory which downloads and installs the providers. You'll also see a folder .terraform created which holds the config data. It will give the output as follows:

The next command is terraform plan to check if our code is proper. Once it's done we can apply the configuration with terraform apply command.
terraform plan
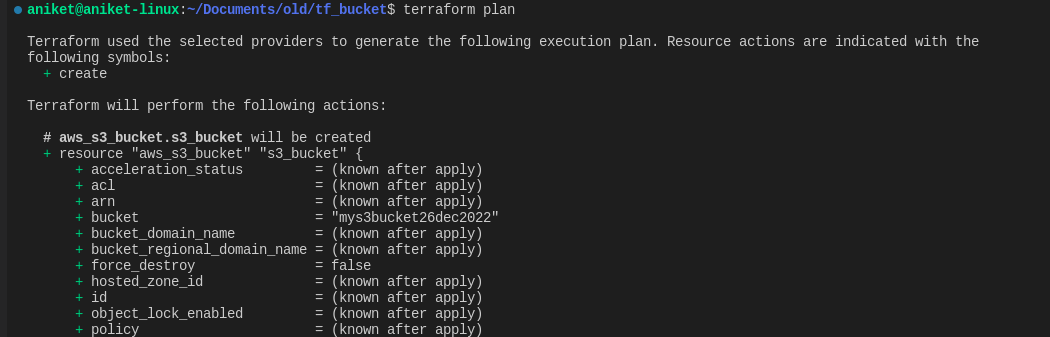

The terraform state file, by default, is named terraform.tfstate and is held in the same directory where Terraform is run. It is created after running terraform apply . The actual content of this file is a JSON formatted mapping of the resources defined in the configuration and those that exist in your infrastructure.
terraform apply
when prompted⚠️
Enter a value: Yes
or else you can use this command to automatically approve the status
terraform apply -auto-approve
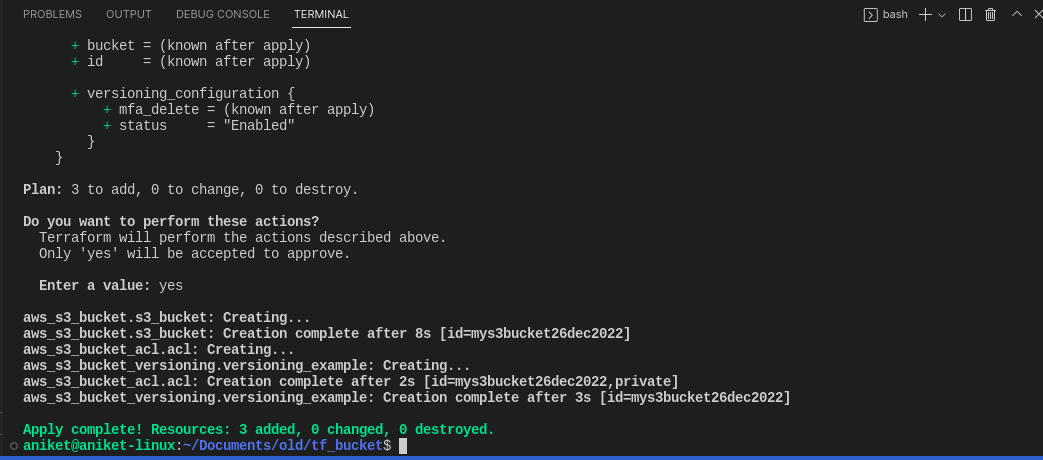
Our resources are created successfully✅. If you get any error check the names which you have given to your bucket it should be unique and also check whether the credentials are proper. Get back to your web browser and check your AWS Console.
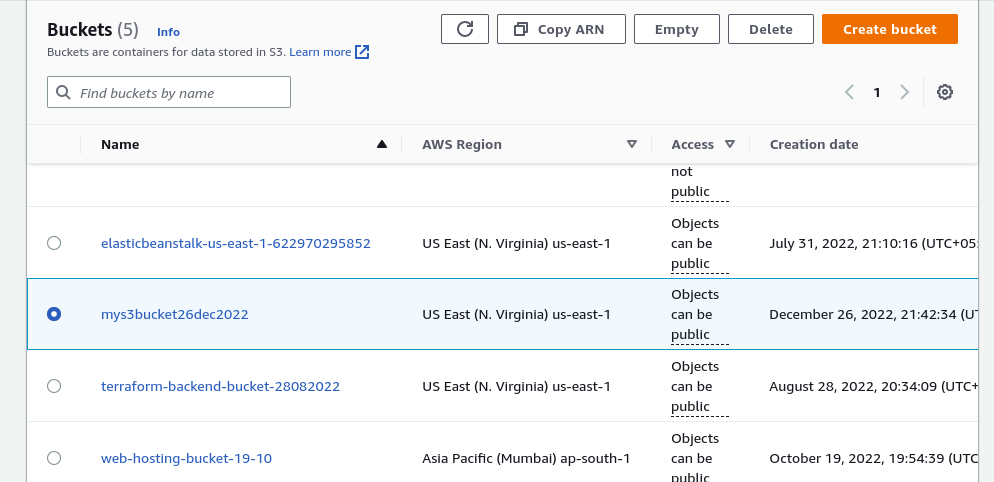
Search S3 bucket and open the S3 Management console where you'll see your bucket created with the name that you gave for the bucket. If you see your bucket then 👏clap👏 for yourself you've successfully created a cloud resource using IaC i.e terraform.

You may see all the previous buckets(if you haven't created any buckets earlier it'll only show your recent bucket). Here's mine...
Click on your bucket name and go to the properties tab, where you can see that bucket versioning is enabled. We have configured this setting for our bucket through code.

You are now free to access this bucket, you can check AWS docs to perform some operations like adding or deleting files, docs, images, videos or any data you want to store on this bucket. It's free to use. Here's the link for AWS docs to S3 bucket objects https://docs.aws.amazon.com/AmazonS3/latest/userguide/uploading-downloading-objects.html
Alright, we've created the bucket resource, but what if you want to create another bucket??
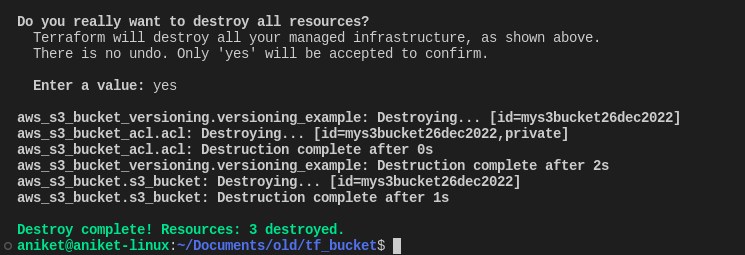
If you want to delete this bucket just use the command terraform destroy. It will destroy all the resources in the way they were created.
Alright, we've created the bucket resource and also deleted it, but what if you want to create another bucket??🤔 Don't think much 🐒 that's the usage of terraform just change the bucket name from the code and create a new one you can also edit the properties which you want to configure. Refer to this documentation from HashiCorp Terraform for the detailed case study. https://registry.terraform.io/providers/hashicorp/aws/latest/docs/resources/s3_bucket
Note: You can create another file named test.tfvars which will fetch the variable values directly and we won't have to write them in the terminal every time. Remember to edit "YOUR_ACCESS_KEY_ID" and "YOUR_SECRET_ACCESS_KEY" with your respective credentials. Just use the following command while planning or applying.
terraform plan -var-file test.tfvars
terraform apply -var-file test.tfvars

With that said we have completed the task of creating AWS resources using Terraform. You can also create multiple resources and integrate them with each other like web servers with AWS VPC, EC2, ELB, Auto scaling. Database resources like DynamoDB Aurora, RDS, etc. I'll write a new blog for creating a cloud network using VPC for running Nginx server using compute services. Hope you enjoyed this article and learned more things about terraform and it's practical applications. Do share your thoughts below and also give a read to other blogs! 🤠🤟


