

Deploying a Python Flask app to Docker using Jenkins can be a bit daunting at first, but with the right tools and a clear understanding of the process, it can be relatively straightforward.
In this tutorial, we will walk through the steps of deploying a simple Flask app to Docker using Jenkins. We will start by setting up our development environment, then create a Flask app and Dockerfile, and finally configure Jenkins to automate the build and deployment process.
Prerequisites
Before we get started, make sure you have the following installed on your local machine:
Docker
Git
Python 3
We will also be using Jenkins as our Continuous Integration/Continuous Deployment (CI/CD) tool. You can download Jenkins from the official website on your laptop or else just use a cloud server like AWS EC2 (we'll see how to do that in the following steps).
Setting up the Development Environment:
First, let's create a new Python virtual environment to isolate our Flask app dependencies from the rest of our system. To do this, navigate to your working directory in a terminal or command prompt and run the following command:
python3 -m venv myenv
This will create a new virtual environment named "myenv" in your current directory. Activate the virtual environment by running the following command:
source myenv/bin/activate
You should see the virtual environment name "(myenv)" appear before your command prompt. This indicates that you are now working within the virtual environment and any packages you install will be isolated from the rest of your system.
Next, let's install Flask by running the following command:
pip install Flask
This will install the latest version of Flask and all its dependencies within the virtual environment.
Creating a Flask App
Now that our development environment is set up, let's create a basic Flask app. Navigate to your working directory and create a new file called "weather.py".
from flask import Flask
import requests

app = Flask(__name__)

@app.route('/', methods =['GET'])
def home():
    construct_url = "https://api.openweathermap.org/data/2.5/weather?q=India&appid=" + "YOUR_API_KEY"
    response = requests.get(construct_url)

    list_of_data = response.json()

    html_data = f"""
    <table border="1">
    <tr>
        <td>country_code</td>
        <td>coordinates</td>
        <td>temp</td>
        <td>pressure</td>
        <td>humidity</td>
    </tr>
    <tr>
        <td>{str(list_of_data['sys']['country'])}</td>
        <td>{str(list_of_data['coord']['lon']) + '  '
                    + str(list_of_data['coord']['lat'])}</td>
        <td>{str(list_of_data['main']['temp']) + 'K'}</td>
        <td>{str(list_of_data['main']['pressure'])}</td>
        <td>{str(list_of_data['main']['humidity'])}</td>
    </tr>

</table>
    """
    return html_data

if __name__ == "__main__":
    app.run(host='0.0.0.0')
This app simply creates a Flask web server and returns the code for http request to openweather api.
To know about Openweathermap api follow this link: https://openweathermap.org/
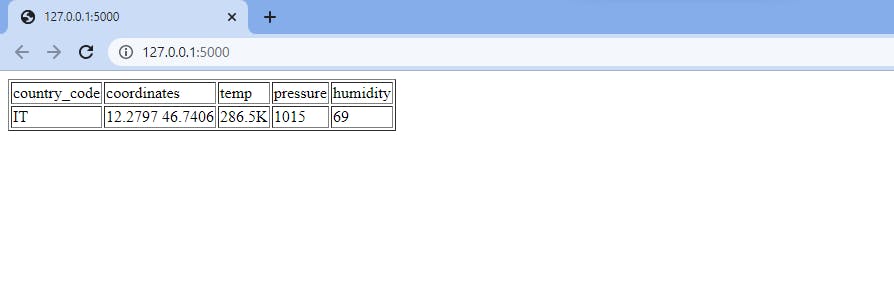
You can test your Flask app by running the following command:
python weather.py
This should start the Flask web server and you can access your app at http://localhost:5000. Here is a ss of output.
Before we move on, make sure to stop the Flask server by pressing CTRL+C in your terminal.
Creating a Dockerfile
Next, we will create a Dockerfile to package our Flask app and all its dependencies into a Docker container. Navigate to your working directory and create a new file called "Dockerfile". Here's an example Dockerfile to get started:
FROM python:3.9-slim-buster

WORKDIR /weather

COPY requirements.txt requirements.txt

RUN pip3 install -r requirements.txt

COPY . /weather

CMD ["python3", "weather.py"]
This is a Dockerfile that describes the steps to build an image for our weather app. Here's what each line does:
FROM python:3.9-slim-buster: This line specifies the base image to use for the new image. In this case, the base image ispython:3.9-slim-buster, which is a slim version of the official Python 3.9 image, based on Debian "Buster".WORKDIR /weather: This line sets the working directory to/weather, which is the directory where the application code will be copied.COPY requirements.txt requirements.txt: This line copies therequirements.txtfile from the host machine to the container's/weatherdirectory.RUN pip3 install -r requirements.txt: This line runs thepip3 installcommand to install the Python dependencies listed inrequirements.txt.COPY . /weather: This line copies all files and directories from the current directory on the host machine to the container's/weatherdirectory.CMD ["python3", "weather.py"]: This line specifies the default command to run when a container is started from the image. In this case, it runs thepython3command withweather.pyas its argument, which starts the Python application.
Installing Jenkins on AWS EC2 instance
Here are the steps to create a Jenkins server on EC2:
Launch an EC2 instance: First, log in to your AWS dashboard and launch an Amazon EC2 instance.
Choose an Amazon Machine Image (AMI): For a Jenkins server, we can use an Amazon Linux AMI.
Configure the instance: You can select the instance type, choose an existing security group, and create or choose a new key pair.
Open port 8080: Jenkins runs on port 8080, so navigate to the security group assigned to the instance, and add an inbound rule to allow traffic on port 8080.
Install Java: Jenkins requires Java to run, so install the latest version of Java on the EC2 instance using
sudo yum install java-1.8.0-openjdk-devel.Install Jenkins: To install Jenkins on the EC2 instance, run the following commands:
sudo wget -O /etc/yum.repos.d/jenkins.repo https://pkg.jenkins.io/redhat-stable/jenkins.repo
sudo rpm --import https://pkg.jenkins.io/redhat-stable/jenkins.io.key
sudo yum upgrade
sudo yum install jenkins
Start Jenkins: After installation is complete, start Jenkins using
sudo service jenkins start.Access Jenkins: To access Jenkins, open a web browser and go to
http://[your_instance_ip]:8080.Complete Jenkins setup: You will be prompted to enter a password to unlock Jenkins. Retrieve the password by running
sudo cat /var/lib/jenkins/secrets/initialAdminPasswordon the EC2 instance. Follow the on-screen instructions to complete the Jenkins setup process.
That's it! You should now have a fully functional Jenkins server running on an EC2 instance.
Configuring Jenkins
Now that our Flask app and Dockerfile are ready, let's configure Jenkins to automate the build and deployment process. Follow these steps:
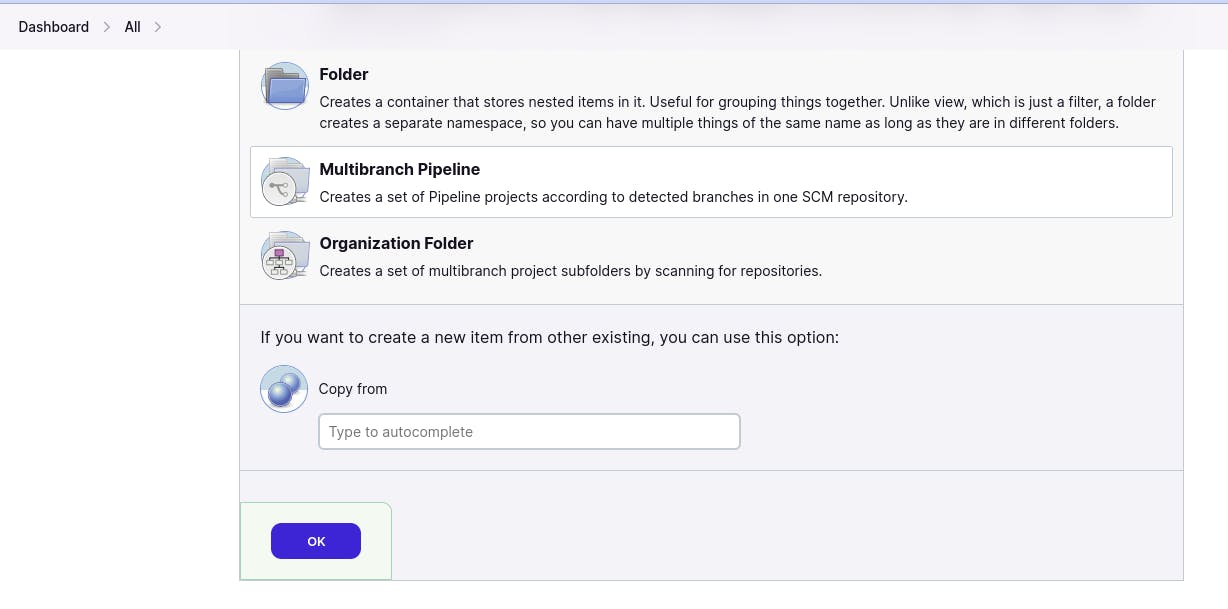
Launch Jenkins and create a new Multibranch Pipeline project
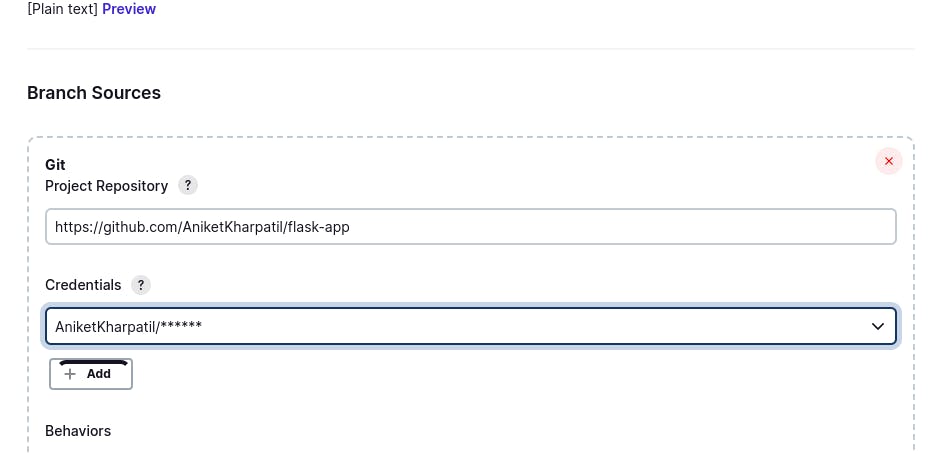
Under "Branch Sources", add a new "Git" source and enter the URL of your Git repository where your Flask app and Dockerfile are stored. refer my github repo: https://github.com/AniketKharpatil/flask-app
Under "Scan Multibranch Pipeline Triggers", select "Periodically if not otherwise run" and set the interval to every 5 minutes.

Click "Save" to create the project.
Now, whenever a new branch or Pull Request is created in your Git repository, Jenkins will automatically scan and detect it and create a new pipeline for it.
To define our pipeline, we need to create a new "Jenkinsfile" in the root of our Git repository:
pipeline {
  agent any

  stages {
    stage('Build Docker Image') {
      steps {
        script {
          docker.build("weather-app", "-f Dockerfile .")
        }
      }
    }

    stage('Run Docker Container') {
      steps {
          sh 'docker run -d -p 5000:5000 weather-app'
      }
    }
  }

  post {
    always {
      sh 'echo "Running on port 5000" '
    }
  }
}
This Jenkinsfile defines a Jenkins pipeline to build and run a Docker container for a weather application on port 5000. Here's what each part of the script does:
agent any: This line specifies that the pipeline can be run on any available Jenkins agent.stages: This block defines the stages of the pipeline.stage('Build Docker Image'): This stage builds a Docker image using theDockerfilepresent in the current directory. Thedocker.buildcommand takes two arguments, the name of the Docker image and the location of theDockerfile.stage('Run Docker Container'): This stage runs the Docker container in detached mode (-d) and maps the container's port 5000 to the host machine's port 5000 (-p 5000:5000).post: This block defines actions to be taken after the pipeline has been executed.always: This block always runs and executes the commands inside it. In this case, it prints the message "Running on port 5000" to the console.
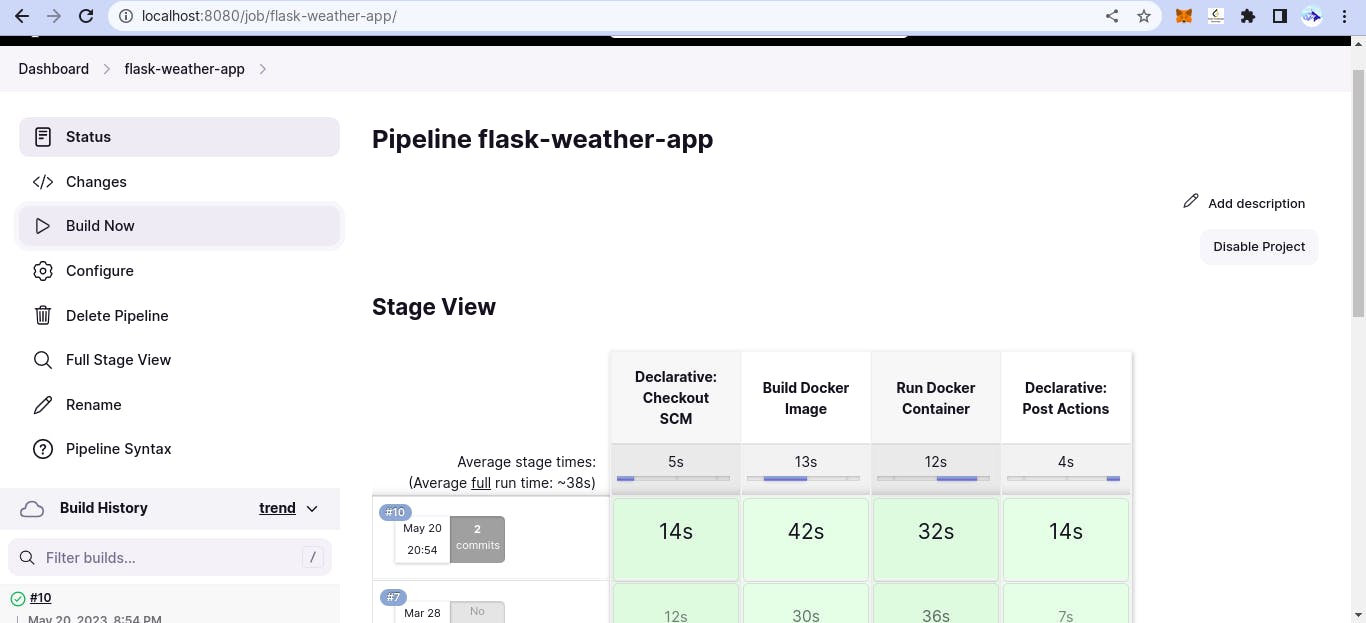
Here is the build overview from jenkins (mine is showing build 10 your's will show it as 1 )
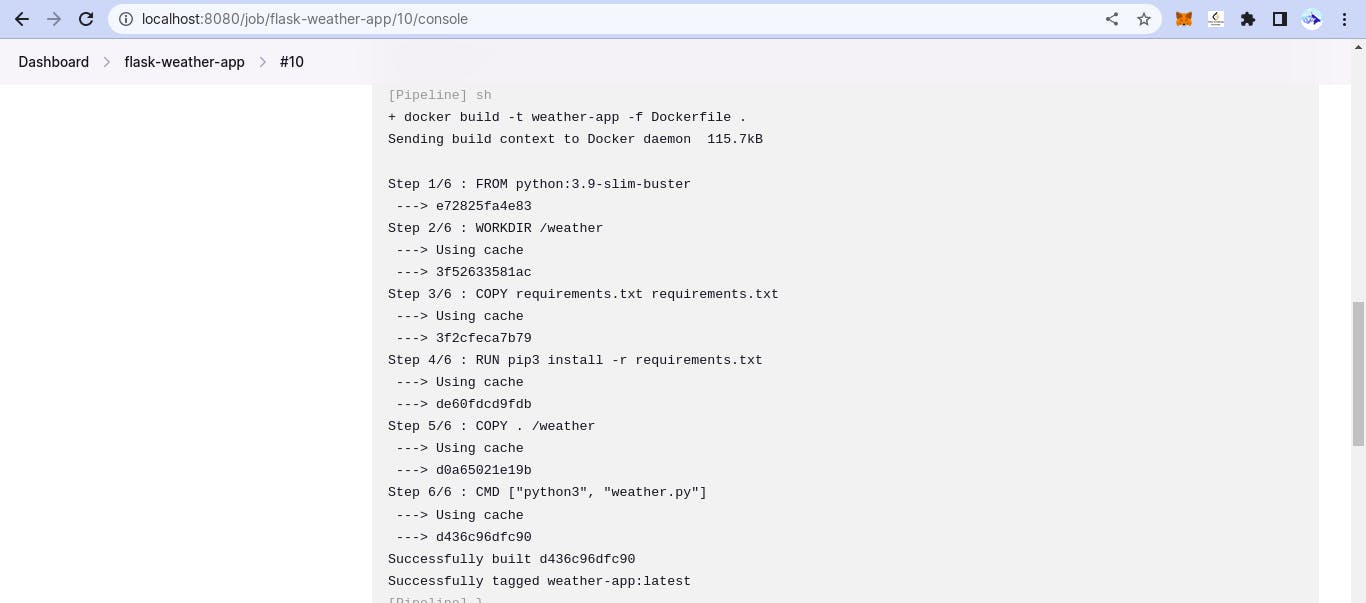
If anything fails you can just click on the build and check the console output to get a debug view log and resolve the errors.
here is my console output:
Finally, let's test our new pipeline by creating a new branch in our Git repository and making a change to our Flask app. Push the changes to your Git repository and wait for Jenkins to scan the new branch and create a new pipeline. Jenkins should automatically run through all the stages of the pipeline and deploy the latest version of your Flask app to Docker. You can confirm this by visiting the URL of your Docker container. Note: this will only run on your local docker container if you want to deploy it to dockerhub then you need to follow few more steps and update the jenkinsfile. I'll cover that part in my next article.
Congratulations! You have successfully deployed a Python Flask app to Docker using Jenkins.