⚓️Introduction
In this blog we are going to discuss about Kubernetes, why it's needed and how it works with simplified terminologies and real-world examples. Also, you will be able to install Kubernetes on your system and deploy your app with quick and easy instructions so let's get started.
Kubernetes, or "K8s" for short, is an open-source container orchestration platform that automates the deployment, scaling, and management of containerized applications. It was originally developed by Google and is now maintained by the Cloud Native Computing Foundation (CNCF).
Fun fact: The name Kubernetes originates from Greek, meaning 'helmsman' or 'pilot' 👨✈️☸️
Benefits of Kubernetes:
Scalability
High availability
Portability
Declarative configuration
Ecosystem and extensibility
Before we dive into how Kubernetes works, let's take a look 👀 at why it is needed in the first place.
⚓️Why Kubernetes?
Containers have become a popular way of packaging and deploying applications😺. They provide a lightweight and consistent runtime environment that can be easily moved between different systems. However, managing a large number of containers can quickly become complex, especially when deploying them across multiple servers.
This is where Kubernetes comes in. Kubernetes makes it easy to manage containers by automating the deployment, scaling, and management of containerized applications. It allows developers to focus on building and deploying applications, while Kubernetes takes care of managing the underlying infrastructure.
Let's say you have a microservices-based application that consists of multiple services, such as web, API, and database. Each service is containerized and runs on a separate host.
You will need to manage the deployment, scaling, and ongoing maintenance of each service. Here's how Kubernetes can help:
Deployment: You can create deployment YAML files that define how many replicas of each service should be running.
Scaling: If your application becomes more popular and you need to scale your services, you can simply update the deployment file to increase the number of replicas. Kubernetes will automatically create and manage the additional replicas.
Management: Kubernetes provides built-in features for managing the uptime and health of your services. For example, you can set up health checks that Kubernetes will use to monitor each service.
Rollbacks: If a new version of one of your microservices causes issues, Kubernetes allows you to rollback to a previous version of that service.
Security: Kubernetes provides built-in security features, such as network policies, that allow you to control access to your services and protect your application's data.
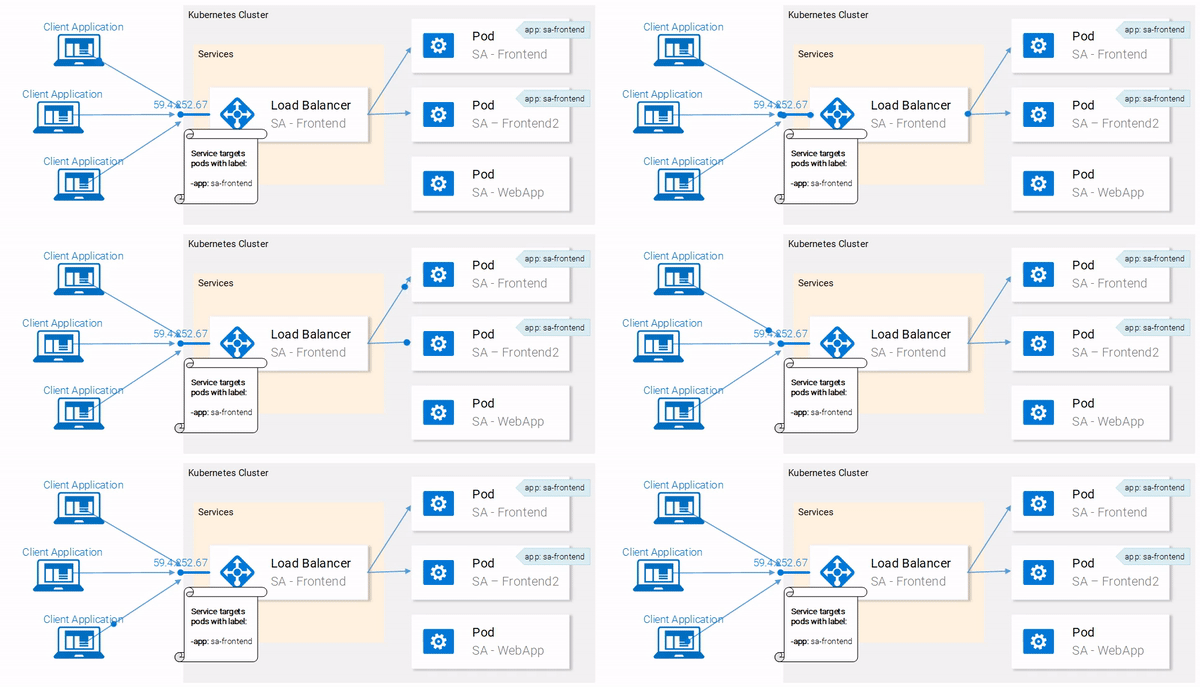
So how does Kubernetes work?
At its core, Kubernetes is a cluster manager. It consists of a master node and multiple worker nodes. The master node is responsible for managing the cluster and making decisions about how to deploy and manage applications. The worker nodes are responsible for running containers and providing the resources needed by those containers.
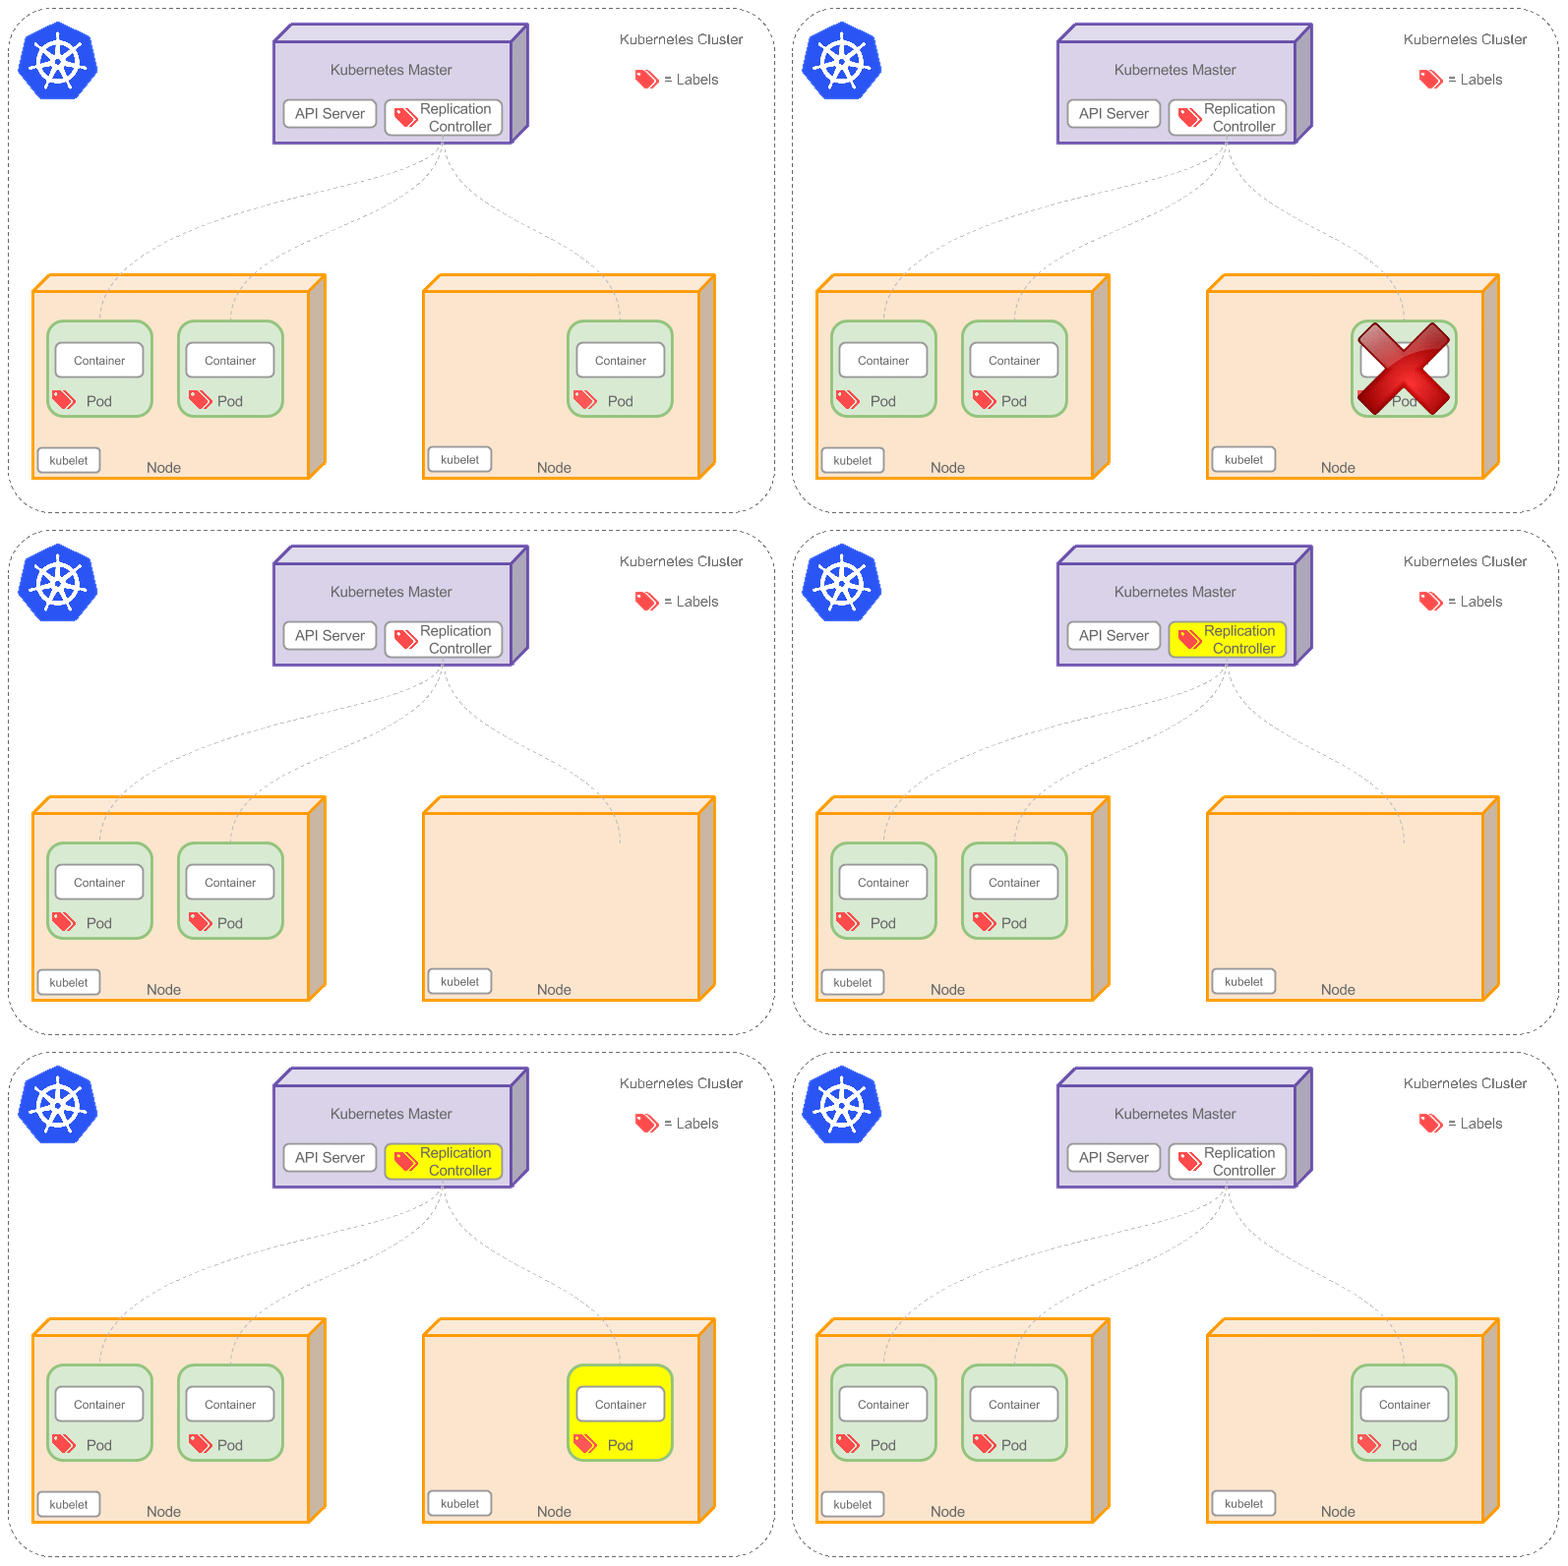
*gif image credits: IT with Passion
Imagine you're playing a massive multiplayer online game (MMO) with your friends. The game world is vast, and you want to explore every corner and complete exciting quests. However, coordinating and managing a group of friends in such a vast game can be challenging.

Now think of Kubernetes as a party organizer for your gaming group. Here's how it works:
Containerization: In the game, you and your friends have different roles, like warriors, mages, and healers. Each role requires specific equipment, abilities, and items. With Kubernetes, you can create containers that hold all the necessary gear and tools for each role. These containers keep everything organized and ensure each player has what they need.
Cluster Management: Now, imagine that you and your friends form a guild and decide to explore the game world together. Kubernetes acts as the guild leader, managing and coordinating the activities of the group. It assigns tasks, sets goals, and keeps track of everyone's progress.
Service Discovery and Load Balancing: The guild leader and the members use a special chat system to communicate. They can share information, strategize, and help each other out. The guild leader ensures that everyone has an equal chance to participate in exciting quests and evenly distributes resources among the members.
Automatic Scaling: As your guild gains more members, you realize you need to take on more challenging quests and raids. Kubernetes is smart and can detect when the group needs additional players to handle the tougher battles. It automatically recruits new members, making sure your guild has the right number of players to tackle the challenges.
Rolling Updates and Rollbacks: Occasionally, the game introduces updates or improvements that affect gameplay. Kubernetes helps manage these changes smoothly. It applies updates to the game servers one by one, ensuring that the gameplay remains stable. If an update causes issues, it can quickly revert to a previous version, so everyone can continue playing without disruptions.
Persistent Storage: Throughout the game, you collect valuable items, gold, and achievements. Kubernetes ensures that all these treasures are stored safely for each guild member. It keeps track of each player's progress and ensures that their hard-earned rewards are preserved.
So, Kubernetes is like having a leader and organizer in your video game. It helps manage your group, keeps things organized, enables efficient communication, handles changes and updates, and ensures that everyone's progress is safely stored. Just as a guild leader makes gaming more enjoyable and organized, Kubernetes makes managing and running applications smoother and more efficient for developers.
⚓️K8s Architecture
The k8s architecture is designed around the concept of a cluster, which consists of one or more nodes. A node is a physical or virtual machine that runs containers, hosts the Kubernetes runtime environment, and communicates with other nodes. The cluster is managed by a control plane, which is responsible for making decisions about the state of the system.

Components of Kubernetes architecture:
API Server: The API server is the entry point to the Kubernetes system. It exposes the Kubernetes API, which is used for managing resources and communicating with the cluster.
etcd: An etcd is a distributed key-value store that stores the configuration data of the cluster.
Controllers: Controllers are responsible for managing the state of the cluster. They monitor the desired state of the system and take corrective actions to bring the cluster to the desired state.
Scheduler: The scheduler is responsible for scheduling containers on nodes based on available resources and other constraints.
kubelet: Kubelet is the agent that runs on each node in the cluster. It is responsible for managing containers, monitoring their health, and reporting back to the control plane.
Kubernetes also provides several different controllers that allow you to manage the deployment and scaling of your applications. For example, the "Deployment" controller allows you to manage the number of replicas of your application that are running, while the "StatefulSet" controller provides support for managing stateful applications.
When you deploy an application to Kubernetes, you create a YAML file that contains the definition of the application. Instead of creating docker containers with all the configurations, we use YAML file to define the configuration of a pod. A YAML file specifies the desired state of the object that it describes, which in this case, is a pod.
The master node takes this file and uses it to create "pods". Now what is a pod?
☸️A pod is the smallest deployable unit in Kubernetes and represents a single instance of an application. A pod can contain one or more containers, which are run within the same network namespace and can share the same resources. Usually, a single container runs inside of a pod. But for cases where a few containers are tightly coupled, you may opt to run more than one container inside of the same Pod. Kubernetes takes on the work of connecting your pod to the network and the rest of the Kubernetes environment.
⚓️Initial Setup
Here are the steps to install Minikube and interact with Kubernetes from your PC:
Install a hypervisor such as VirtualBox or VMware on your PC that is compatible with Minikube. For our project we will use docker so just make sure you already have docker installed on your system.
Install kubectl, 'the Kubernetes command-line tool', on your PC (https://kubernetes.io/docs/tasks/tools/).
Skip documentation and Just use this command:
curl.exe -LO "https://dl.k8s.io/release/v1.27.2/bin/windows/amd64/kubectl.exe"Download and install Minikube from the official website based on your OS (https://minikube.sigs.k8s.io/docs/start/).
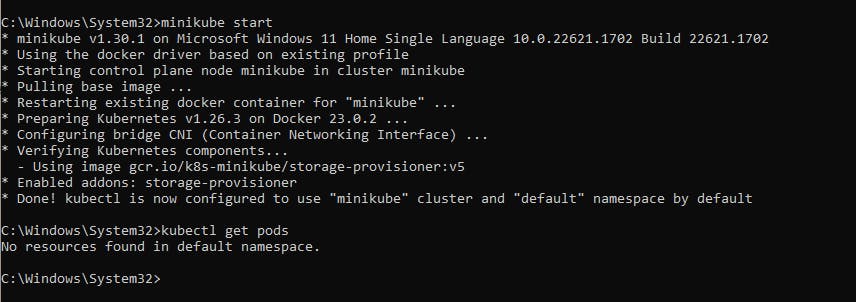
Start Minikube. This will create a single-node Kubernetes cluster on your local machine. You can start Minikube using the following command:
minikube startVerify that the Kubernetes cluster is up and running by entering the following command:
kubectl cluster-infoOnce Minikube is running, you can use kubectl to interact with Kubernetes, the following command shows the pods which are created on the k8s.
kubectl get podsOutput:

⚓️Create a k8s pod
Now that kubectl is installed and minikube is running we can easily create our first pod. There are two ways of interacting with it: an Imperative way and a Declarative way. The Imperative way is via a command (for example):
kubectl run nginx-server --image=nginx
We'll go for the industry used way which is declarative way. Here are the steps to create a kubectl pod for running the nginx server configured by the user:
Create a new YAML file, for example,
nginx.yml. (YAML files created with 'yaml' and 'yml' file extensions, Both are the same in interpretation and syntax.)☸️A typical YAML file for a pod will include the following key information:
apiVersion: specifies the Kubernetes API version being used to deploy the pod.kind: specifies that the object being created is a pod.metadata: includes information about the pod, such as its name and any labels or annotations that should be applied.spec: includes the pod's specification, which includes information on the containers that will run inside the pod, their configuration, and other related settings.
Open the file in a text editor and paste the following code:
 apiVersion: v1
 kind: Pod
 metadata:
   name: testnginx
   labels:
     name: nginxdemo
 spec:
   containers:
     - image: nginx
       name: nginx
       ports:
       - containerPort: 80
Save the file and exit the text editor.
Open a terminal and navigate to the directory where the
nginx.ymlfile is located.Run the following command to create the pod with nginx service:
kubectl create -f nginx.yml
The above YAML code defines a Kubernetes pod named testnginx that runs the nginx container on the pod. The Nginx container in the pod runs on port 80 by default.
To access the Nginx container from outside the cluster, you'll need to expose the container as a Kubernetes service. The service will create a stable IP address and DNS name that you can use to access the Nginx container.
Once the service is created, you can retrieve the IP address of the service by running:
kubectl get service nginx-service
or
kubectl get pods -o wide
This will display the IP address of the nginx, which can be used to access the Nginx container running in the nginx pod on port 80.

Now we have the IP for our pod, but how can we check the output for nginx server. Lets get to the root of this, our pod is created on minikube which is running on a docker container. We can fetch that docker image and ssh into minikube so that we can inspect the IP for the nginx pod. For this we'll use curl command.
Just use the command which will log you in:
minikube ssh
Now use the curl command (replace IP_of_Pod with the IP address you got from the previous kubectl command):
curl IP_of_Pod
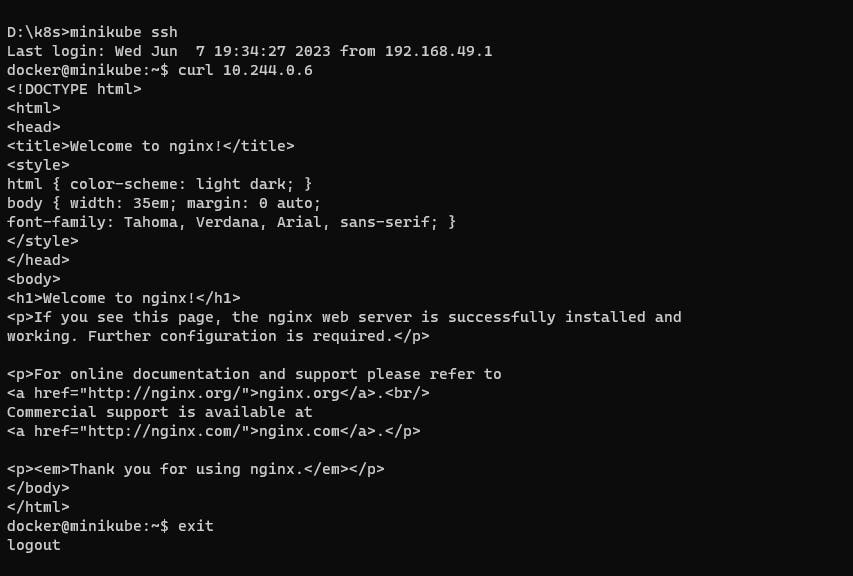
As you can see the nginx server is running and showing the above output. If you reached till this step☑️ then you have successfully implemented the deployment of pod.
Now our test is complete let's delete the pod using following command:
kubectl delete pod testnginx

Kubernetes also includes a number of features that make it easy to manage the availability and reliability of your applications. For example, you can define "health checks" 👩⚕️ that Kubernetes will use to determine whether an instance of your application is healthy. If an instance fails its health check, Kubernetes will automatically restart the container until it becomes healthy again.
We'll see all these operations in the upcoming article.
⚓️Conclusion
💁In summary, Kubernetes is an open-source container orchestration platform that makes it easy to deploy, scale, and manage containerized applications. We have successfully created a pod for running nginx container on k8s using minikube and kubectl from our system. By automating many of the management tasks involved in deploying and managing containerized applications, Kubernetes frees developers to focus on building great software. With its powerful features and growing ecosystem, Kubernetes is quickly becoming a must-have tool for any organization working with containers.
